


SEC Publisher allows you to include revision tags automatically from red-lined documents. It can handle red-lined documents in Word and PDF formats.
When utilizing the ‘Optimized for MS Word’ option to generate EDGARized HTML, refer to the section ‘Setting Track Changes/Red-lining Options in MS Word’ before conversion. This will allow SEC Publisher to identify the revisions using the “Track Changes” structure of MS Word.
When utilizing the ‘All MS Office formats and PDFs’ option to generate EDGARized HTML, refer to the section, ‘Setting Revision Tagging Options in SEC Publisher’. This will allow you to define the revision markings used to identify the revisions.
Setting Track Changes/Red-lining Options in MS Word
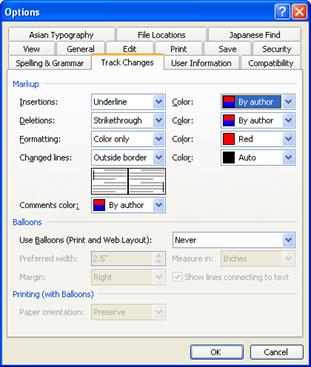
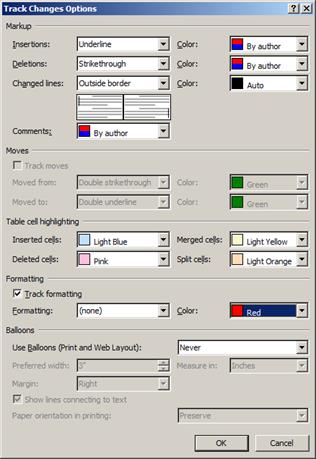
The following needs to be set up in MS Word:
|
Insertion: |
Underline |
|
Deletion: |
Strikethrough |
|
Use Balloons: |
Never |
Please see sample settings in Word below.
MS Word 2003 and
earlier:
MS Word Menu Bar > Tools
> Options > Track Changes tab
MS Word 2007 and
later:
MS Word Menu Bar > Review
> Track Changes button > Change Tracking
Options…
To set the Revision Tagging Options, choose Options > Revision Tagging...
Tip: This option is only available when utilizing the “All MS Office formats and PDFs” option to generate EDGARized HTML. If the ‘Optimized for MS Word’ option is utilized, the ‘Revision Tagging...’ option is grayed out (see ‘Setting Track Changes/Red-lining Options in MS Word’ for instructions on configuring MS Word when utilizing the ‘Optimized for MS Word’ option to generate EDGARized HTML).
The following window will appear:
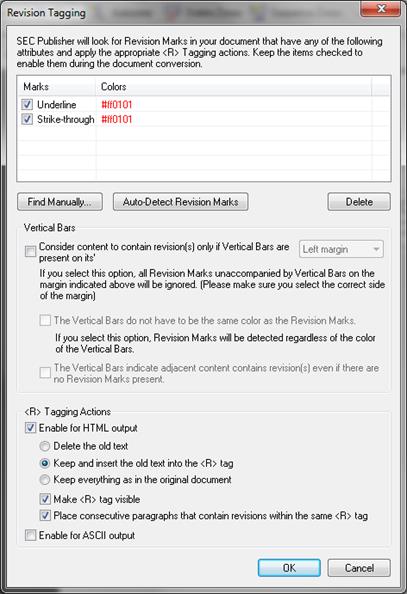
SEC Publisher allows you to manually zone an area and identify revision tags.
When the ‘Find Manually…’ button is chosen, the following dialog box will appear:
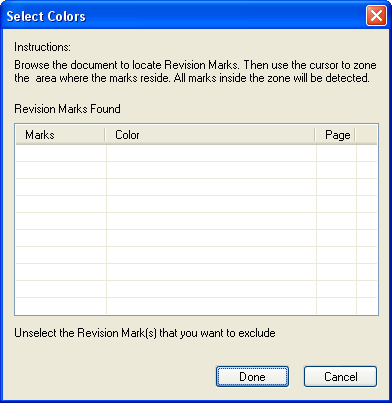
If you are in the EDGAR HTML or EDGAR ASCII tab, then SEC Publisher will automatically switch to the Source tab.
Manually create a zone on the document to include revision marks such as caret, underline or strikethrough. SEC Publisher will automatically detect all the revision marks in this zone and list them with their associated colors in the ‘Select Colors’ interface.
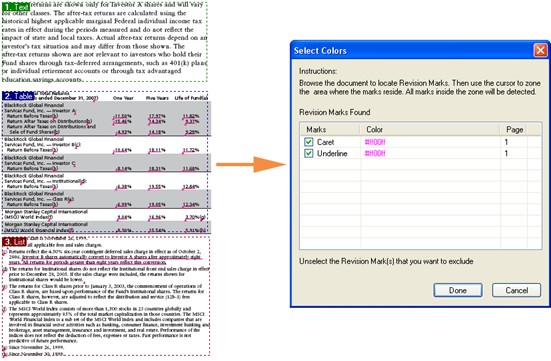
You will have the option to exclude any of the revision marks by unselecting that entry. Press ‘Done’ to accept the selection or ‘Cancel’ to abort.
When the ‘Auto-Detect Revision Mark’ button is chosen, the following dialog box will appear after a short period of time:

SEC Publisher has automatically detected the Revision Marks, associated colors and which page(s) they appear throughout the document.
You will have the option to exclude any of the revision marks by unselecting that entry. Press ‘Done’ to accept the selection or ‘Cancel’ to abort.
Select the revision mark that you want to remove and click the ‘Delete’ button.
If the first option is selected, SEC Publisher will ignore the Revision Marks that do not have the specified Vertical Bars in the selected side of the margin.
Warning: If tables have visible grids (vertical and horizontal lines), then the automated revision detection might pick them up as revision markers. We recommend that you do not use the Vertical Bars option to track changes in these cases. Please use the color detection tool only.
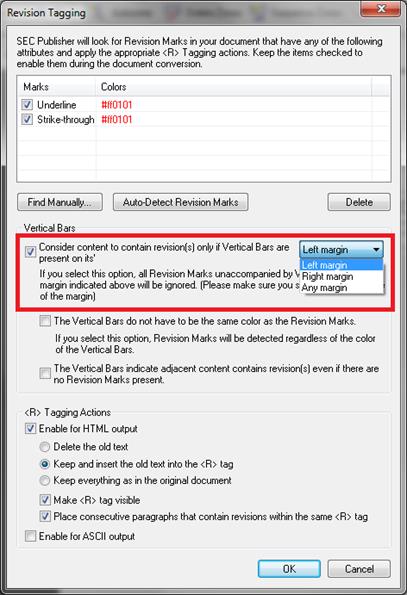
Warning: If the first option is selected, SEC Publisher will only tag the data that has Vertical Bars on the chosen margin. If you unselect this option, the data will be tagged regardless whether it has Vertical Bars or not.
If the second option is selected, the color of the Vertical Bars will be ignored.
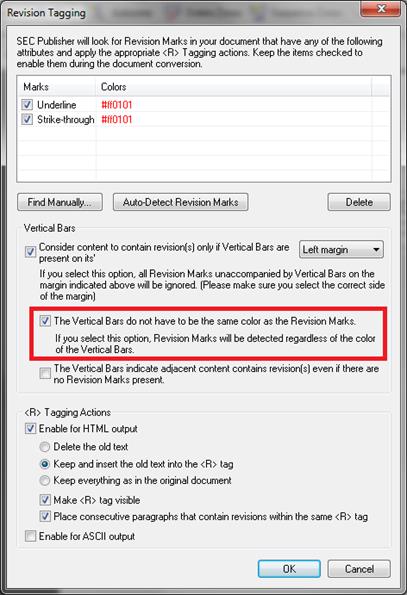
Warning: If the second option is selected, the Vertical Bars do not need to be the same color as the Revision Marks.
Select this option to enable EDGAR HTML Output, EDGAR ASCII Output or both.
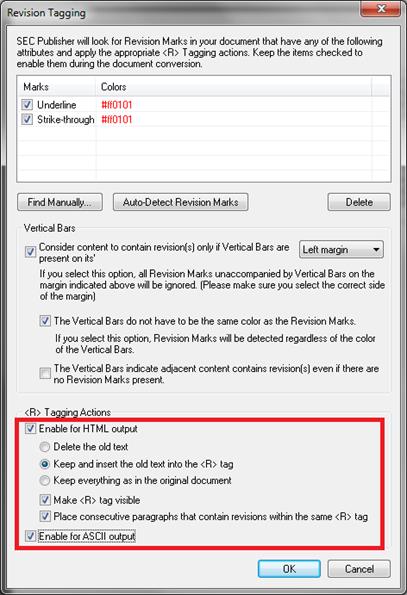
Select this option to enable Revision Tags for the EDGAR HTML Output.
This will produce a clean final document. Deletions and insertions will be accepted. Inside the code, the <R> tagging will be inserted.
This will produce a clean final document. Insertions will be accepted. Deletions will be hidden inside the code and will not show up in the browser. Inside the code, the <R> tagging will be inserted.
This will create an HTML file which will reproduce the original file including the redlining.
This will make the revision tag visible.
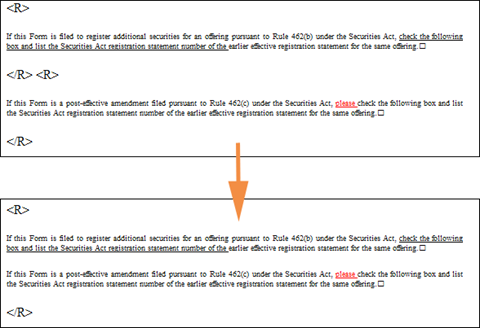
This will put consecutive paragraphs containing revisions inside the same <R> tag.
Select this option to enable Revision Tagging for the EDGAR ASCII Output.
Related Topics
©1999-2022 BCL Technologies. All Rights Reserved. Unauthorized duplication or distribution prohibited.
| Converted from CHM to HTML with chm2web Standard 2.85 (unicode) |